1
In the course page, turn "Edit mode" on (Original: Turn editing on).
2
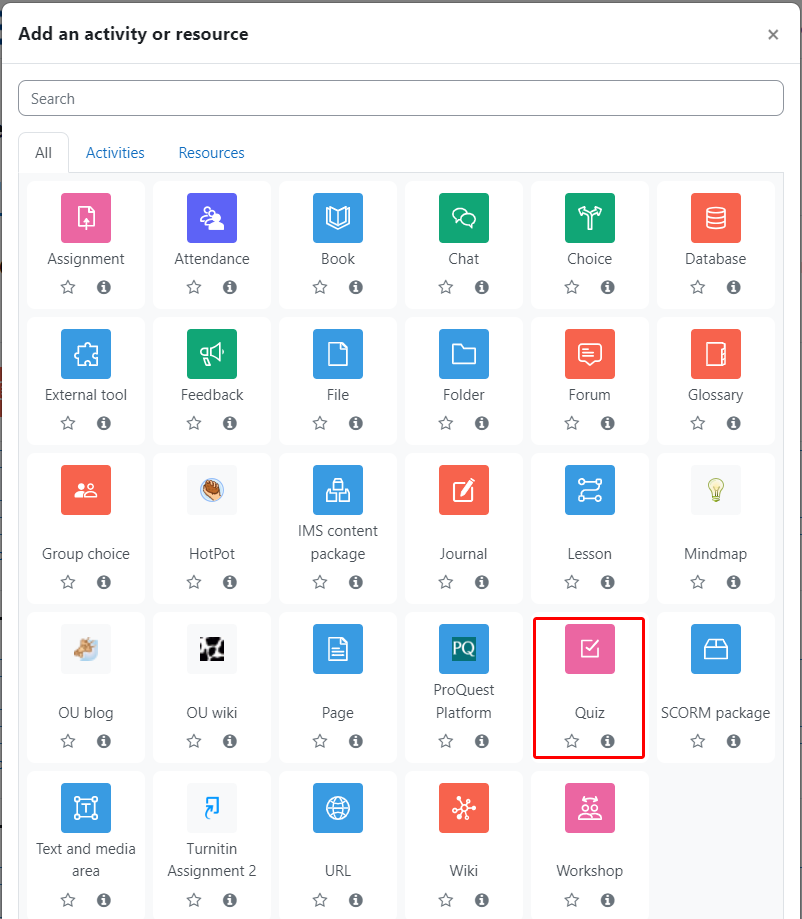
Click "Add an activity or resource",
select "Quiz" from the list.
3
In the General section, enter the Name and Description (optional) of the quiz.
4
In the Timing section:
- Enable and select dates to Open the quiz and Close the quiz.
- Enable and set a Time limit, if necessary.
- Select the appropriate option for When time expires.
- If you wish to allow a grace period for student submissions, check Enable and set a Submission grace period.
5
In the Grade section:
- Select the Grade category within your Gradebook for your quiz.
- Set the number of Attempts allowed, the Grade to pass and, if multiple attempts are allowed, which Grading method Moodle should use.
Note: If this is a final exam, you can give just one attempt in "Attempts allowed".
6
In the Layout section:
- Select where you want New page breaks to fall.
- Click Show more and select, at Navigation method, whether you want Moodle to force students to answer questions sequentially.
7
In the Question behaviour section:
- Shuffle within questions: select either multiple choice or matched question options randomised.
- How questions behave: the following lists the 2 most commonly used settings:
- Deferred feedback – students must submit entire quiz before they can see the grade or feedback;
- Interactive with multiple tries – students can see immediate feedback after completing each question.
- If multiple attempts are allowed, click "Show more" and select "Each attempt builds on the last", if you want each new quiz attempt to contain the results of the previous attempt. This allows students to make several attempts to complete a quiz.
8
Overall feedback:
The overall feedback is a text message students see after completing a quiz. You can customise that message according to the final score attained by a student, e.g. to praise high performers, or to tell flunkers the rules of retaking the quiz.
9
Complete any other necessary page sections, then click to proceed to the page for adding questions to your quiz.
10
On the start page of a quiz, select "Add question".
Add questions to a quiz. While you can add questions to a specific quiz one by one, adding questions into your question bank first and then retrieve some or all of them from the bank to the quiz desired is recommeded, as it will save you time and efforts in the future.
Moodle supports 16 question types:
- Multiple choice
- True/False
- Short ansewer
- Numerical
- Calculated
- Essay
- Matching
- Random short answer matching
- Embedded answers (Cloze)
- Calculated multchoice
- Calculated simple
- Drag and drop into text
- Drag and drop into markers
- Drag and drop onto image
- Freehand drawing (ETH)
- Select missing words
Question Bank - Adding Questions
A
A question bank in Moodle is an overall stock of all the questions and tasks you have ever created on the platform. This feature saves time since there’s no need to create everything from scratch: if you need to prepare a test for a new course, you can simply copy ready-made tasks from the bank.
B
On the course homepage, click "Question bank" under the More tab.
C
You can add a new question by clicking "Create a new question".
As mentioned above, question banks keep all the questions you have ever created on Moodle.
Question Bank - Retrieving Questions for a Quiz
D
Click the Quiz you have created and click "Add question".
E
Click "Add" and "+ from question bank" in order to select questions from your question bank(s).
Select the check box(es) of the question(s) to be added to the quiz.
Click Add selected questions to the quiz button.
F
Shuffle:
If you turn this on, the order of the questions will be shuffled when the questions are shown to the students.
This can make it more difficult for students to share answers, but it also makes it more difficult for students to discuss a particular question with you.
Checking the Results of a Quiz
 Student view:
 after student completed the quiz.
I
To check the results, click the quiz desired.
II
Click "Attempts" to review the performance of the students in the selected quiz.
III
On this page, you can generate a report according your needs:
What to include in the report:
- You can select the types of attempts to be shown in the report
Display options:
- How much student information is shown on a page
- Whether the scores of individual questions are listed
You can download table data in different format
- e.g. CSV, Excel (more common), or HTML table, JSON, OBS.
The result of the report
- A chart showing the overall number of students achieving the grade ranges given.


